|
The
Restoration of an American Work of Art
The McCormick-Deering No. 7 Mower
By Chris Tramel
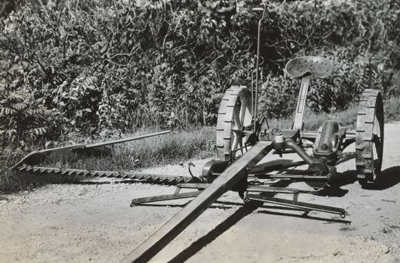
There
is an inherent beauty to the old farm machinery used by so
many generations. There is something about the sight of an
old rusty hay rake sitting in an open field, or a long abandoned
mowing machine with honeysuckle growing up the cutter bar,
that just begs to be photographed and framed. It is a reminder
of days long gone, a time when agriculture dominated the economy,
and whole families made their living from the fertile land.
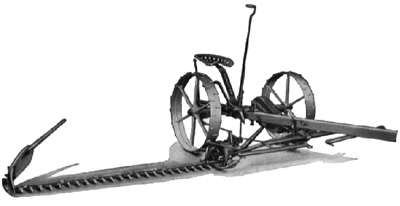 But
there was so much more to these wonderful machines. As a child,
I was always fascinated by the integrate mesh of gears, and
chains, and blades, that were combined to form something that
looked like it belonged in a Jules Verne novel. Surely if
you combined these machine with some mysterious power you
would materialize in some other time or dimension. But
there was so much more to these wonderful machines. As a child,
I was always fascinated by the integrate mesh of gears, and
chains, and blades, that were combined to form something that
looked like it belonged in a Jules Verne novel. Surely if
you combined these machine with some mysterious power you
would materialize in some other time or dimension.
As with
so many children of the farm, the first time being behind
the wheel of any vehicle was in the seat of my grandfather's
Super A Farmall tractor. As there are loyalties in the automotive
world, i.e. Ford, Chevy, Dodge ... there was also loyalty
amongst the farming community. There were green farmers, and
blue farmers, but we were always red farmers. International
Harvester was our equipment of choice.
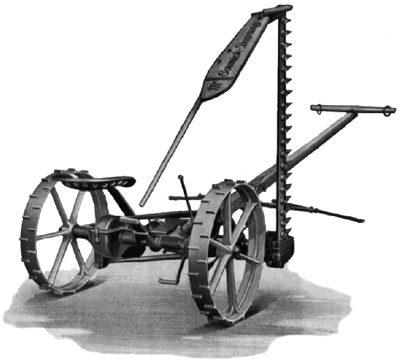
Notice
the grass board logo and striping on the tongue
International
Harvester Company, was formed August 12, 1902, by the merger
of the McCormick Harvesting Machine Company, Deering Harvester
Company, Milwaukee Harvester Company, Plano Harvester Company,
and Warder, Bushnell & Glessner Company. Cyrus H. McCormick
Jr. was named president of the board, while Charles Deering
was named the chairman.
In 1911,
the company began producing implements such as mowers, rakes
and fertilizer spreaders under the McCormick name. The McCormick-Deering
line of mowers included the No. 6 Plain Mower, No. 6 Vertical
Lift Mower and Big 6 Mower. In following years, the company
produced the McCormick-Deering No. 6 Plain Lift Mower.
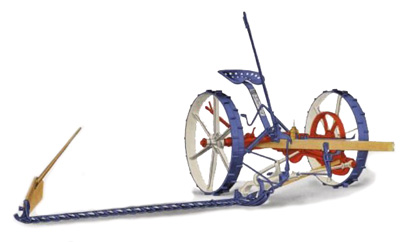
A
No. 6 McCormick mower - Blue seat and spring and white bars
Horse-drawn
mowers were generally designed with a series of gears that
would power a mower bar. As the wheels turned, they would
turn several gears which would turn a flywheel. The flywheel
would move a wooden pitman arm back and forth, which was connected
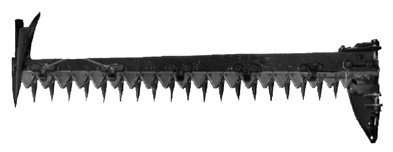
to the mower bar. The mower bar consisted of a set of knives
or blades, that would move back and forth between a set of
guards. The guards, fitted with serrated plates known as ledger
plates, would act in a scissor action with the knives, cutting
grass and other foliage.
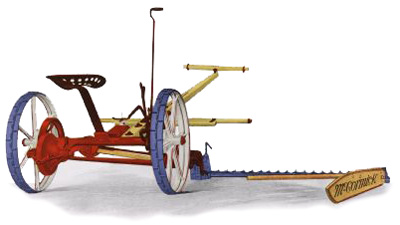
No 6 Mower
In 1929
the company introduced an improvement in the horse-drawn mowers
with the No. 7 Regular Lift, No. 7 Vertical Lift, and Big
7 Regular Lift. The No. 7 was the first enclosed gear mower,
which meant the gears were housed in a gear box with a bath
of oil continuingly lubricating the works. Think of a differential
or rear end under a truck or car. Before the No. 7, mowers
were an open gear design, meaning the user would constantly
have to stop and manually oil the drive gears on the inner
wheels.
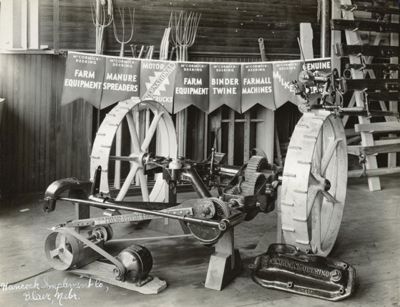
The main
axle is made in two sections (one long and one short shaft)
with the pawl-and-ratchet devices placed at the junction of
the two sections inside the gear case, similar to the differential
arrangement on an automobile. Placing the pawls and ratchets
in this location protects them from dust and undue wear and
assures proper lubrication at all times. The axle revolves
in four roller bearings (two single and two double) which
are encased in steel sleeves that can be replaced when worn.
The bearings are automatically oiled from the gear case and
require no attention. Leather oil seals enclosed in metal
cases prevent oil from leaking past the ends of the axle.
The mower wheels are keyed solidly to the axle sections, eliminating
end play, wobble, and lost motion.

The Plain
Lift Regular No. 7 and Combination Regular No. 7 (which could
be converted to a plain lift or vertical lift cutter bar)
came with the option of two bar sizes, a 4-1/2 foot and a
5-foot mower bar, while the Plain Lift Big 7 offered bar sizes
from 4-1/2 to 7-foot. The Combination Big 7 had bar sizes
of 4-1/2 and 5-foot. The weight of the Regular No. 7 ranged
between 770-780 pounds, depending on bar size, while the Big
7 weighed between 835 and 860 pounds. The Combination No.
7 weighed between 780 and 790 pounds, while the Combination
Big 7 weighed between 845-850 pounds. Big 7 mowers have heavier
and wider rim wheels than the Regular No. 7. Pneumatic-tired
wheels could also be obtained at extra cost for any size of
No. 7.
The vertical-lift
mowers possess the feature of having both vertical and plain
lift and can be changed instantly from one to the other by
merely shifting a lever. The plain-lift mowers do not have
this combination-lift feature. Vertical-lift mowers permit
raising the cutter bar to a full vertical position without
stopping the mower or leaving the seat. This mower has a high
horizontal lift for passing over trash and stones and a full
vertical lift that swings the bar out of the way of high obstructions.
Either type of lift is instantly available by merely moving
a small lever.
 The
No. 7 came with regular equipment, which included a tongue,
neckyoke, steel doubletrees, knives and ledger plates, a combination
wrench, and oil can. Additional accessories were also available,
including: The
No. 7 came with regular equipment, which included a tongue,
neckyoke, steel doubletrees, knives and ledger plates, a combination
wrench, and oil can. Additional accessories were also available,
including:
Reaping
attachment for 4-1/2 and 5-foot sizes
Buncher attachment for 4-1/2, 5, 6, and 7-foot sizes
Weed attachment
Two-wheel tongue truck
Pea and bean vine lifters (set of six including outer
shoe runner)
Lespedeza bars (4-1/2, 5, and 6-foot)
Weed and brush bar, 3-1/2, 4, 4-1/2, and 5-foot cutting
widths
Weed bar, 3, 3-1/2, 4, 4-1/2, 5, 6, and 7-foot cutting
widths
Mower pea bar attachment (5-ft.)
Pneumatic tired wheels
Stub pole tractor hitch (for hitching mower direct to
tractor)
Steering pole or trailer hitch (for hitching trailing
mower behind tractor mower or for hitching second of two
mowers to tractor)
Knives with under-serrated sections
Smooth ledger plates.
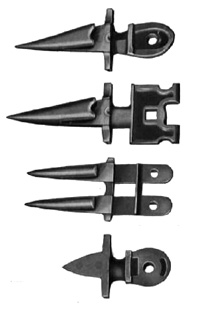 Heavy-Duty
Bar - This bar was substantially constructed
for heavy work and cutting over rough, stony ground. It
had heavy-type guards and was supplied with heavy knives.
Guards have the same spacing as on regular mower bar, but
are larger and heavier and make continuous contact at the
base. Heavy-Duty
Bar - This bar was substantially constructed
for heavy work and cutting over rough, stony ground. It
had heavy-type guards and was supplied with heavy knives.
Guards have the same spacing as on regular mower bar, but
are larger and heavier and make continuous contact at the
base.
Weed
Bar - This bar was designed for cutting heavy
weeds, light brush, etc. It had heavy, blunt guards that
have no lips. This feature permits cutting woody stems and
stalks with less draft and likelihood of choking. A heavy
knife was supplied.
Lespedeza
Bar - A low-cut bar with steel double guards
of special type having 1-1/2-inch spacing. Designed especially
for cutting Lespedeza and other crops where an extremely
low cut is desired. Steel guards have no ledger plates.
Knife with under-serrated sections were supplied.
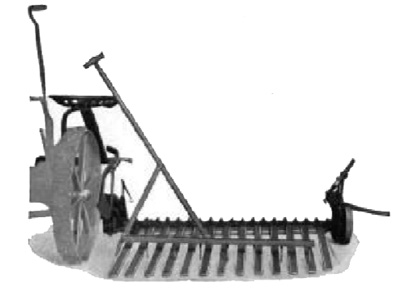
Reaper
Attachment - A reaping attachment for cutting
grain and special seed crops could be supplied for use with
all McCormick-Deering mowers having 4-1/2 and 5-foot cutter
bars. The attachment included an extra seat over the right
wheel for the operator, who reels the crop onto the platform
with a rake and retains it until a gavel of the right size
is secured, then dumps it off upon the ground.
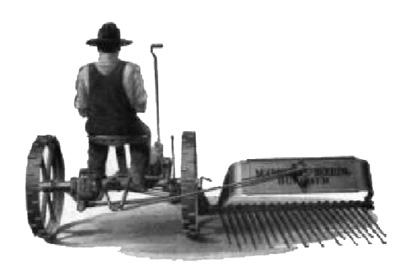
Buncher
Attachment - This attachment was designed for
gathering very short hay, which could not be raked easily.
It was used also for gathering seed crops. The hay is gathered
upon the slatted platform back of the cutter bar, and when
a sufficient amount has accumulated, the driver dumps it
by raising the shield. This was accomplished with a foot
lever. Buncher attachments could be furnished for 4-1/2,
5 and 6-foot mowers.
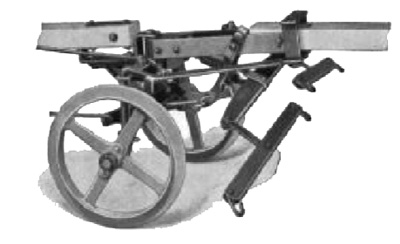
Mower
Tongue Truck - Under certain conditions owners
sometimes preferred to equip their mowers with a tongue
truck. The tongue truck reduces side draft and takes the
neck weight off the horses. The truck was provided with
a casting permitting the attachment of a draft rod running
from the inner shoe hinge on the cutter bar to the tongue
truck. The tongue truck could be supplied with a long pole
and stub pole, or could be supplied without either pole
when so ordered.
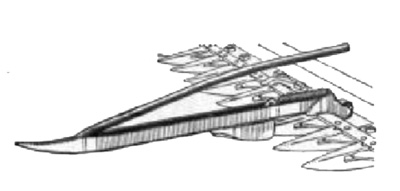
Vine
Lifters - Used when cutting matted grass, vines,
etc., also on binders for lifting lodged grain. The lifters
fit over the guards and are bolted individually in place.
Upper bar vibrates and clears itself of vines.

Weed
Attachment - McCormick-Deering mowers could
be equipped with a weed attachment which holds the cutter
bar off the ground at a sufficient height to avoid stones
or to pass over a young crop of grain. The attachment consists
of an adjustable hook which supports the inner end of the
cutter bar and a wheel for supporting the outer end of the
cutter bar above the ground. Both ends are adjustable so
that the cutter bar can be raised to any height up to 12
inches.
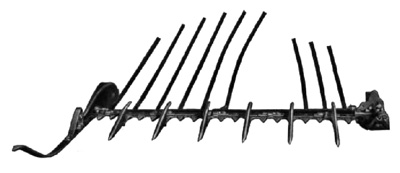
Canning
Pea Mower Bar Attachment - This bar is made
especially for harvesting green peas for canning. The bar
is regularly equipped with pea vine lifters (set of six),
pea vine divider, and windrower fingers. The pea vine lifters
are of special design, smoothly finished, and streamlined
to give the most efficient action. The lifters are hinged
so that the points follow the contour of the ground closely,
picking up all the vines and raising the pods above the
sickle so that none will be cut or wasted. The windrower
is designed so that the vines are rolled gently into windrows,
with the pods inside and the vines and stems on the outside.
This prevents the pods from drying out and keeps the peas
fresh. The windrow is deposited at the rear, out of the
way of the horses or tractor wheels on the following round.
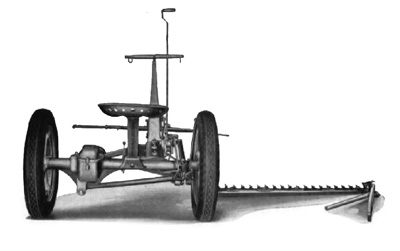
No.
7 Pneumatic-Tired Mower - For cutting weeds
and grass along the shoulders of hard-surfaced roads, the
No. 7 mower could be equipped with pneumatic-tired wheels
for highway use. Pneumatic tires provided efficient traction
on paved or hard-surfaced roads and made a comfortably riding
machine for the operator. The tires are balloon type, 5.25
x 21-inch size, mounted on conventional automobile-type
rims which fit over the wheel spokes and are secured by
locking lugs. This makes removal of the tire as simple as
the removal of an automobile tire. The wheels have special
split type hubs and are clamped tightly around the axle
by four bolts. In addition, the wheels are keyed to the
axle, eliminating all likelihood of wobble and end play.
The No. 7 pneumatic-tired mower was available in 4-1/2,
5, 6, and 7-foot sizes. The equipment was same as for the
standard No. 7 mower. Weight, deduct 90 lb.
In 1939,
the company improved the design again with the No. 9 mower.
This design moved the gear box back a bit, giving the machine
better balance and reducing the pole (tongue) weight. This
design would last until the end of horse drawn mower production.
The last year for the No. 9 mower was 1951.
Was
There a No. 8 Mower?
While
production reports from McCormick-Deering do not list a No.
8 mower, apparently they do exist. I have found no documentation
about a No. 8 mower, however I have seen several post and
photos of No. 8s. They were very similar to a No. 7 mower,
but what looks like a casting over the gear cover to allow
for a larger gear. There is also no casting for the oil can
holder.
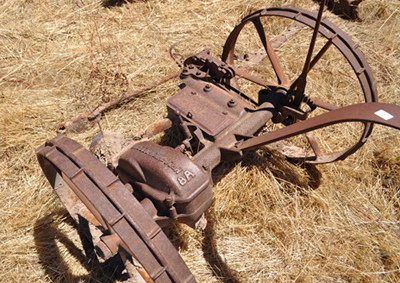
According
to some sources, the No. 8A was an export model out of McCormick-Deering's
German site, at Neuss on the Rhine, near Dusseldorf. Production
of implements under the McCormick brand name started there
in 1911 with the typical products being, mowers, rakes and
fertilizer distributors.
By the
time the Nazis came into power, high taxes and tariffs on
imports made it difficult for companies outside of Germany
to make a profit. The company was also forbidden from exporting
their German marks, so in 1936 McCormick-Deering dropped farm
implements at the Neuss factory and began making the more
profitable tractors full time.
Another
thing that may have contributed to the lack of information
about the No. 8 mower is the fact that 70 percent of the McCormick-Deering
factory in Germany was destroyed by Allied bombing during
WWII. For anyone with additional information on these, it
would be appreciated if you would share your knowledge.
Paint
Schemes for McCormick-Deering Mowers
Mowers
seemed to have a varying color scheme early on, with the general
rule that the main body be red, the cutter bar blue, and the
wheels white (or more specifically cream). Seats and springs
may have been painted red or blue, while some connecting bars
may have been red or white.
In 1927,
a Paint Committee was formed by the company to create a standardized
color scheme for different equipment, which would effect the
McCormick No. 6 Mower - 1916-1933, the McCormick-Deering No.
7 Mower - 1929-1939, and the McCormick-Deering No. 9 Mower
- 1939-1951. While the committee was formed between the No.
6's production years, these mowers could have varying color
schemes depending on when the mower was made.

The correct
colors for a No. 7 mower would be an oil based Harvester Red
on the main body and all levers, seat, and seat spring, while
the mower bar, guards, and outer wheels are a blue enamel.
The inner wheels should be Harvester White (which is actually
a cream or almond color), while the pole (tongue), evener,
and tracker (grass board) is ochre (a burnt orange color).
The tracker rod (the rod extending from the grass board) is
a natural finish, while the pitman rod should be boiled in
oil. All ironworks attached to the pole and evener should
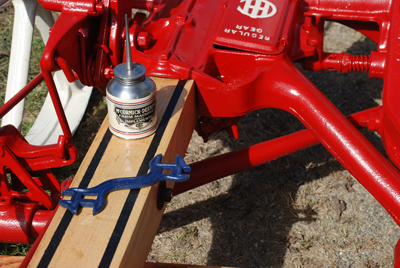
be Indian Red. The wrench that comes with the mower should
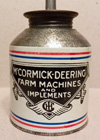
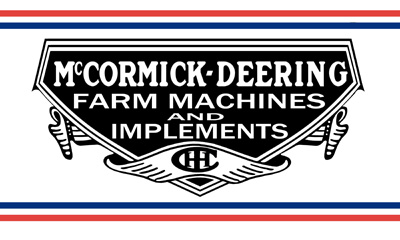
be blue, while the oil can should be white with the McCormick-Deering
logo, bordered with red and blue stripes at the top and bottom.
Lettering on the tracker should say "McCormick-Deering"
in Indian Red, with a red strip running along the top. The
pole should also have decorative striping in black running
from each side and crossing across the top just past the doubletrees.

The same
color scheme is used on the No. 9 mowers (1939) except the
blue paint was eliminated from he outer wheels and the striping
was discontinued. The cutter bar was also changed from blue
enamel to blue lacquer.
In June,1940
the seat spring, pawl holders, and eveners were painted blue,
but later that same year the eveners were changed to Indian
red.
The following
is on record at the Wisconsin Historical Society's McCormick-Deering
archives:
"RED,
WHITE, AND BLUE" PAINT COLOR SCHEME
The
Paint Committee was appointed by Mr. Alex Legge for the
purpose of establishing a channel through which any changes
in the painting of the Harvester Company's products may
pass. Now that the Company is on the one-line basis, and
the entire product in the United States and Canada is sold
under the name "McCormick-Deering" (motor trucks
excepted), it is desirable to establish a uniform paint
program for three purposes:
First—To
improve the quality of the painting
Second—To
standardize the color scheme on all lines so that they will
be distinctive, harmonious, and attractive in appearance
Third—So
that machines of similar style or general appearance will
be painted alike, even though they are made at different
Works
The
Paint Committee has tried out various combinations of colors
on different machines and has finally decided on a red,
white, and blue program for the general line of farm machines,
excluding motor trucks, tractors, engines, cream separators,
wagons, and sleighs.
The
following Works are affected:
McCormick
Deering
West Pullman
Auburn
Rock Falls
P & 0 Plow
Richmond
Chattanooga Plow
Hamilton

While
in a general way this new color scheme is to be known as
a "red, white, and blue" program, cream will be
used instead of white, and other supplemental colors will
be employed. The following explanations will apply in a
general way to all machines affected by specific Paint Committee
decisions to be issued later:
Harvester
Red
Harvester Cream
As
a general rule, Harvester red will be the dominating color
and will be applied to the main parts of the machines.
Harvester
cream will be used on all ground wheels unless otherwise
specified and on certain parts of some machines where the
employment of this color will tend to lighten the appearance
of the machine.
-
- - - - - - -
January
14, 1927
Paint Committee Decision No. 34
MOWER
Harvester
Red - Frame, tilting lever, raising lever, foot
lever, raising lever quadrant, seat and seat spring, and
rods not otherwise specified
Harvester Cream - Wheels
Harvester Blue - Cutter bar and facing
on wheels
Indian Red - Ironing on pole and evener
Ochre - Pole, evener, and tracker board
Natural Wood - Track clearer stick
Boiled in Oil - Pitman
-
- - - - - - -
January
9, 1939
Paint Committee Decision No. 112
DISCONTINUING
BLUE COLOR ON RIMS OF MOWER WHEELS
McCormick Works Product
The
cost of painting the outside of the rims of mower wheels
blue has amounted to a total of $2,117.40 on the manufacturing
order of 98,000 mowers the past year. As there seems to
be no special benefit in painting these wheel rims blue
it has been decided to discontinue this and to dip the entire
wheel in a cream color. Effective from the date of this
decision McCormick Works will dip all mower wheels in cream
and eliminate the blue color on the outside of the rim.
-
- - - - - - -
Paint
Committee Decision No. 113
DIPPING ALL MOWER BARS IN BLUE LACQUER
McCormick Works Product
It
is now the practice of the McCormick Works to paint mower
bars in three different ways. The Lespedeza bar is blue
lacquer, power-driven mower bars are dipped in clear varnish,
and horse-driven mower bars are dipped in a blue enamel.
The suggestion comes from the McCormick Works that in the
future they be permitted to paint all mower bars by dipping
them in a blue lacquer.
As this will result in a considerable saving in the manufacture
of mowers, the Paint Committee authorizes the McCormick
Works from this date to paint all mower bars by dipping
into blue lacquer.
-
- - - - - - -
June
23, 1939
Paint Committee Decision No, 117
The
cost reduction committee at McCormick Works has made the
following recommendations:
2.
That the striping be left off from mower tongues and grass
boards. The striping on the mower tongues consists of a
decorative design in black. The same tongue when shipped
out for repairs is not striped. The striping on grass boards
consists of one dark red stripe along the top edge. If this
striping is eliminated, a saving of $726.40 can be made
on the annual manufacturing order.
The
Paint Committee hereby approves the use of red paint only
on the A frame of ensilage cutters, the elimination of striping
on mower tongues, grass boards, and on the gatherer boards
of one-row and two-row vertical corn binders.
-
- - - - - - -
June
21, 1940
Paint Committee Decision No. 128
McCORMICK-DEERING NO. 9 MOWER
McCormick Works Product
This
machine will be painted in the following colors:
Harvester
Red - Frame and all parts except wheels, pole, neckyoke,
grass board, grass stick, cutter bar, seat spring, lifting
spring, pitman, pawl holders, and eveners.
Harvester Blue - Seat spring, lifting spring, pawl holders,
and eveners.
Harvester Cream - Wheels
Harvester Ocher - Pole, neckyoke, grass board, and grass
stick.
Natural Wood Varnish - Pitman
Blue Lacquer - Cutter bar
It
is agreed that the frame and other parts painted in Harvester
red will receive one coat only.
-
- - - - - - -
September
26, 1940.
Paint Committee Decision No. 128
McCORMlCK-DEERING NO. 9 MOWER
McCormick Works Product
This
machine will be painted in the following colors:
Harvester
Red - Frame and all parts except wheels, pole, neckyoke,
grass board, grass stick, cutter bar, seat spring, eveners,
pitman, and pawl holders.
Harvester Indian Red - Eveners
Harvester Blue - Seat spring, pawl holders
Harvester Cream - Wheels
Harvester Ocher - Pole, neckyoke, grass board, and grass
stick
Natural Wood Varnish - Pitman
Blue Lacquer - Cutter bar
It
is agreed that the frame and other parts painted in Harvester
Red will receive one coat only. This cancels Paint Committee
Decision No, 128 of June 21, 1940.
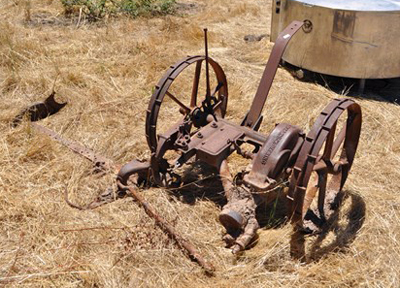
Our
No. 7 McCormick-Deering Mower
I purchased
this old machine from my neighbor 20 years ago. He was a man
that had made his living on a farm his entire life and had
never owned a tractor. His entire career was horse drawn,
and as he went into his 90s he decided it was time to retire.
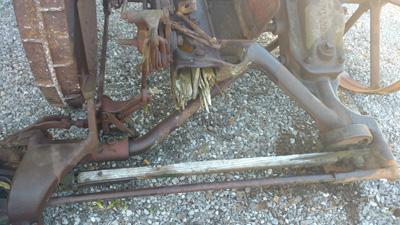
Our
machine had long since retired, and I had to cut a couple
of cedars to free it from its resting place. I actually bought
two of these from the farmer, and this one was in the worst
condition.
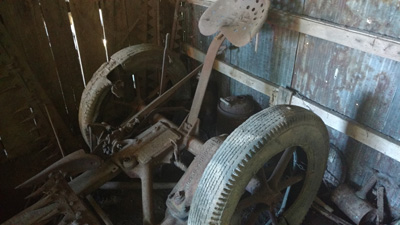
I
bought another No. 7, one that the farmer had been using when
he retired. This one is in working condition, though not very
pretty. Notice the tires? No, this is not the model with pneumatic
tires. In areas where there a lot of rocks, like here in Middle
Tennessee, farmers would cut up old tires, fold them over
the steel wheels, then lace them together. It wouldn't give
you the ride real tires would offer, but it would offer a
little smoother and quieter ride.

Here
I'm beginning to clean off the rust and apply an under coating.
The machine will get a new front seal, new guards and ledger
plates, knives, pitman, grass board, seat, and tongue.
Pole
Length and Wood Type
The pole
or tongue lengths for these mowers are generally 14 foot in
total length. With the mower setting low to the ground, the
team needs forward room for clearance. Some have said that
they use a 12-foot pole, and this is okay depending on the
size of your team. Remember that the tongue sits 15 inches
inside the cast iron mount. Plus, draft horses today are a
lot larger than the teams our grandfathers used.
Another
consideration is the type of hardwood used for the tongue.
Oak and ash are some traditional choices, but new ash is currently
quarantined from being cut due to green beetle infestation
and the tree is endangered. White oak is a strong wood that
is weather resistant, but is very heavy. The No. 7 is already
tongue heavy and trucks might be considered if you use oak
to help relieve the neck weight from the horses.
For my
tongue I have chosen sassafras. Sassafras is very weather
resistant, nearly as strong as oak, but best of all, it is
light in weight. If you can find it available, it makes an
excellent choice for the pole and grass board. Here I have
had a 16-foot straight-grained piece of sassafras cut from
the sawmill, five inches square at one end and tapered down
to three inches at the front end. Don't start the taper for
maybe two or two and a half feet from the large end (remember,
the tongue needs to be squared on the sides in the mount.
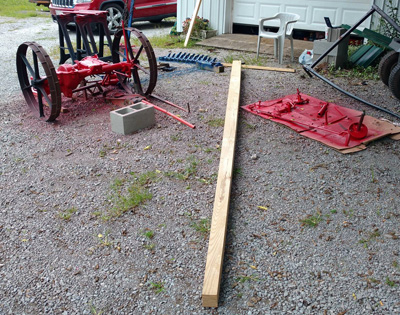
The reason
I have the tongue longer and wider than I need it, is because
it is green. It will be stored in the hayloft of my barn to
season. Wood will shrink in width as it dries. It will only
shrink across the grain, not the length of the wood. It was
cut a couple of feet extra in length to allow for any splitting
that may occur as it dries. Once cured, I will trim the tongue
to the appropriate size.
Changing
the Front Seal
While
the mower is apart for paint, it's a good idea to change the
front oil seal located behind the flywheel. After opening
up the top cover, I found all the gears surprisingly in wonderful
condition. There are no chipped teeth on the gears or signs
of wear, however the front seal had seen better days.
Removing
the front seal is not complicated, but does take some finesse.
First, remove the pitman and bearing from the flywheel, then
inside the main gear case take a small piece of wood and wedge
it between the two large gears to keep the mechanism from
turning.
Once this
is done, take a hammer and another piece of wood (I used a
scrap 2x2) and lightly tap the drive gear on the front shaft.
DO NOT HIT METAL ON METAL! The gear will turn in the same
direction that the flywheel turns when in operation. Do not
try to force it as the teeth on the gear can break. Remove
the wood wedge and turn the mechanism a little, then tap again
on a different gear tooth. Patience is key. Repeat this process
until the gear breaks free of the shaft. Once free, the gear
will simply screw off the rest of the way.
The procedure
is the same for a No. 9 mower, however be aware that on this
model there is a washer on the shaft located between the gear
and housing. If you pull the shaft out without removing the
washer, it will drop into the oil reservoir and will be very
frustrating to try to retrieve.
The oil
seal is not a mysterious item that is no longer available.
It's a simple oil seal that can be acquired at your local
auto parts store. The number for the original seal will cross
to two different oil seals, one large front to back and one
skinny. The large one is the one that fits, though either
will work.
Making
the Tracker (Grass Board)
As with
most antique mowers, the grass board is long gone. The tracker
consists of a wooden paddle-shaped board, mounted to a metal
side plate. The metal plate allows for a bolt and spring to
attach the tracker to the cutter bar. The spring gives the
board some play should it hit some obstacle.
 The
underside of the tracker has a metal strip running the entire
length of the board, and a small vertical metal support strip
on the outer side. On the inside of the board is the tracker
rod or grass stick. It is attached with a metal cover and
two bolts. The rod pivots on one bolt, while the other enters
one of three holes in the board, allowing it to be adjusted
in height. Ours is made of sassafras and will be painted with
the correct logo and stripe. The
underside of the tracker has a metal strip running the entire
length of the board, and a small vertical metal support strip
on the outer side. On the inside of the board is the tracker
rod or grass stick. It is attached with a metal cover and
two bolts. The rod pivots on one bolt, while the other enters
one of three holes in the board, allowing it to be adjusted
in height. Ours is made of sassafras and will be painted with
the correct logo and stripe.
- - - - - - - - -
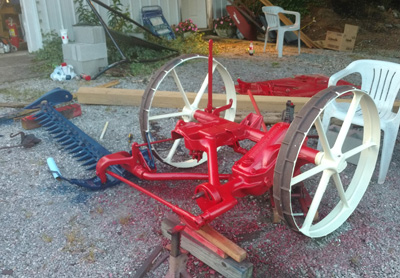
The
red, white, and blue scheme is starting to take shape. The
lacquer paint
takes a long time to dry. Putting a few coats on.
Down
to the Nuts and Bolts of the Project
Like
most machines made during the 1920s and 1930s, the No. 7 mower
has a lot of square head bolts and nuts. There are some hexagon
nuts on the machine, such as the guard nuts and the nuts on
the wheel bolts, but the majority are the old style square
bolts.
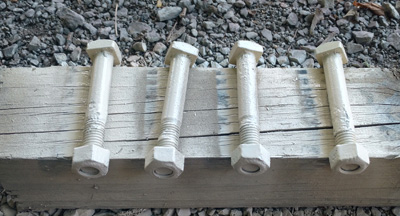
Painting
the original square head wheel bolts and hex nuts
Contrary
to belief, you can still buy brand new square head bolts and
nuts. Just because you can't find them at Lowes or Home Depot
doesn't mean that they are no longer made. It just means that
the big box stores don't sell enough of them to justify stocking
them.

A
brand new square head nut and bolt for the seat spring. The
original
was too far gone, with the seat spring mount being an area
that collects
water, and had to be cut off with a grinder.
Luckily
for restorers in this day and age we have a wonderful resource.
If you're reading this, you already know of the strange and
mysterious land known as the internet. Don't let the naysayers
bring you down with the false claims that they do not make
those anymore. Simply Google "Square Head Bolt"
and a plethora of bolt manufacturers and suppliers should
magically appear.

Brand
new guards with ledger plates. The new tapered bolts for the
guards came
with
new plain hex nuts, but the original nuts were flange nuts.
Flange nuts seem
to work much better, so I replaced them with these hardened
steel flange nuts.
Another
good resource for parts, even parts that are legitimately
not made anymore, is Ebay. A broken lever, wheel, seat spring,
etc ... can all be found on this site ... though patience
is key. You might not find the part you need, right when you
need it, but if you wait, and keep checking, mostly likely
you'll see it pop up. When restoring anything, usually fixing
it fast and fixing right have two different results.
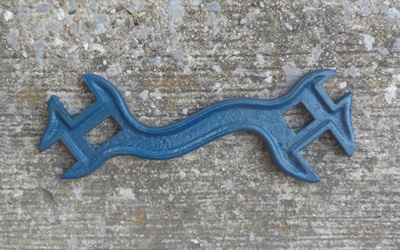
While
we're talking about nuts and bolts, here's a photo of the
combination wrench that came with the No. 7 mower.
- - - - - - -
The
Pitman
The
pitman is a wooden arm that operates that mower. As the gears
turn, they turn the flywheel on which the pitman is mounted.
The pitman moves back and forth, moving the knives back and
forth between the guards.
Some
have asked why the pitman is wood, and why it couldn't be
made of metal? The wooden pitman is actually a safety feature.
If the mower snags on a rock or other hard obstacle, the pitman
is designed to break before metal gears or shafts can be damaged.
Even
so, the pitman needs to be made of a durable hardwood. White
oak, hickory, and even hedge apple or bodock has been used
for pitmans. Pitmans are usually available online for around
$10 or so. In my case, I happened to have a scrap piece of
white oak sitting around my shop that was practically the
right size (I trimmed about 3 inches off). And size IS important.
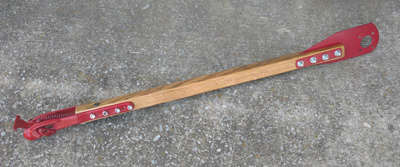
Different
machines have different pitman lengths. IT MUST BE CUT TO
THE EXACT SIZE. A pitman that is too long for your machine
will be short-lived, and most likely will result in broken
knives and bent parts. Always test your pitman before putting
the machine in operation.
-
- - - - - -

08-21-2017
-I painted the outer wheels today (while taking in the total
solar eclipse).
The photo actually makes the inner wheels look more white
than they
actually are. International White is actually more of a cream
or almond color.
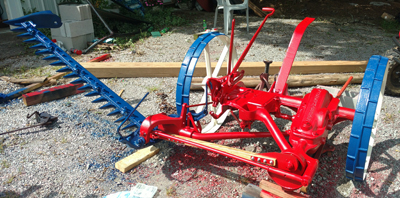
08-25-2017
- Reinstalled the raising levers, seat spring, and pitman,
As
well as all the cotter pins. I also painted the seat, but
that will need
to
dry a few days before installing. Painting takes time.
-
- - - - - -
I
had originally planned on using my sassafras tongue that I
had cut at a local sawmill, but I ran across an ash tongue
which I bought from an Amish gentleman. With the sassafras
tongue still green and needing to season, I've decided to
use it on my other No. 7 mower or maybe my No. 6.
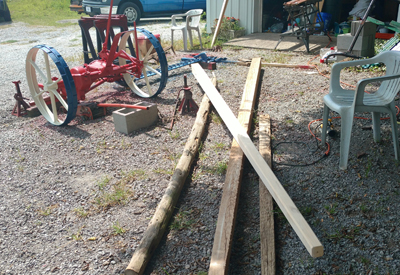
Here's
the new ash pole
The
ash pole is something that will be hard to find very soon.
Ash is now quarantined due to a beetle infestation, and it
looks like the species may go the way of the American chestnut.
After some sanding and shaping, I'll put a coat of varnish
on the tongue. A new mower would have had the tongue painted
ochre, but replacements, like this one, usually came natural.
Most farmers didn't repaint the tongues, though some, like
my grandfather, may have coated the wood with old motor oil
to help preserve it. I'm going to keep the natural wood look
with a clear finish.
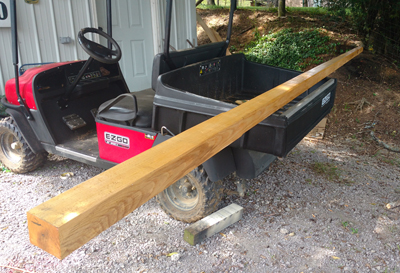
The
tongue or pole with its first coat of varnish.
-
- - - - - - -
The
Oil Can

Since
Hurricane Harvey has moved over our house, I'm working inside
today. So, I decided it would be a good time to restore the
No. 7's oil can. This was a little bit of a complicated restoration.
I found
an original oil can, but the old paint was very faded and
the logo was barely visible. First, I cleaned the can of all
the old paint and years of oil residue, then buffed it with
a very fine steel wool.
Next,
I painted the white field with a lacquer Harvester white paint.
After
drying a few days, I wet sanded the painted area with a 800
grit sandpaper, then applied the logo and stripes using a
special transfer paper. I had found the logo online, but had
to basically redraw it in Photoshop to get the resolution
I needed for the transfer. On the back of the original can,
the dealer's name was so degraded I couldn't read it anymore,
so, I simply added the name of my own business to the can.
I reversed the image, then printed it on the special paper
using a laser printer.
The application
of the transfer is a little intricate, using a special adhesive,
then heating with a heat gun, applying the graphic, then a
series of rubbing the piece, heating, and washing with water.
Afterwards,
I applied a clear lacquer to help protect the logo. I think
it turned out pretty good.
The
Grassboard Logo
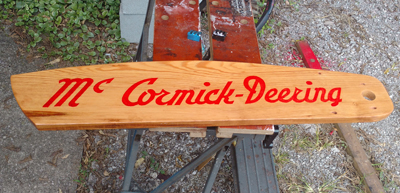
I applied
the "McCormick-Deering" logo to the side of the
grassboard using a water-based polyurethane. I had printed
the logo in reverse on regular paper using a laser printer.
I then applied a thin coat of poly to the grassboard. I then
positioned the logo, face down, on the grassboard and carefully
pushed out any wrinkles or bubbles.
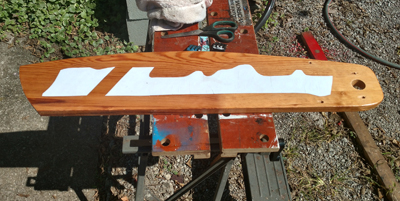
After
letting the poly dry for a few hours, I then wet the paper
with water. Once the paper was saturated, I carefully began
rubbing the paper off of the board. It takes some effort,
but eventually the paper comes off, leaving the ink still
in the coat of polyurethane.
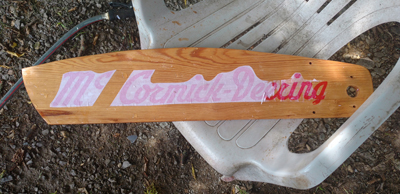
I touched
up any bad spots with a red marker, then applied another coat
of poly to seal and protect the logo. I think it came out
pretty decent. I'll add a red stripe along the top of the
tracker after this dries.
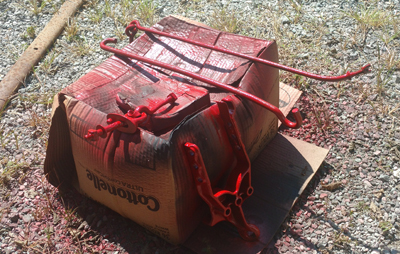
Painting the Pole Iron
Starting
to paint all the hardware on the tongue, which is supposed
to be Indian red. No one sells a Harvester Indian red paint
or has the paint code for the original paint, but as near
as I can tell (from spots of original paint on some of the
parts) Indian red is a bit darker than Harvester red. I found
a paint that I think is pretty close.
-
- - - - - -
Fitting
the Pole
The
No. 7 mower is really coming together now and it's time to
start fitting the tongue or pole. Now, the No. 7 is designed
to accept a square or round tongue, in fact, the tongue I
took off this machine was a round cedar pole. Yes, I said
cedar.

Notice
the domed recess where the tongue mounts.
I know
cedar is no where near the recommended strength for a mowing
machine, but you have to remember that farmers, especially
those that grew up in the Great Depression, used what they
had available. The original pole had obviously broke and the
farmer used the closest thing he had available.
Cedar
is a pioneer tree, meaning that if you scrape the ground clear,
cedar is one of the first trees to reappear and start growing.
The farmer probably had 1,000 of these straight growing trees
to choose from. When his tongue broke, he simply cut a nearby
cedar, trimmed the limbs and shaved the bark, and fitted it
to the mower. It may not have been as nice and strong as a
ready-made oak or ash tongue, but it worked for what he needed.
And, if he was like my grandfather, who grew tobacco and raised
beef cattle, he never grew money trees.
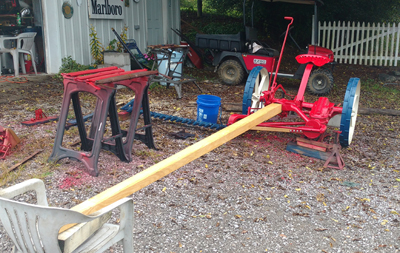
I used a lawn chair to prop up the tongue while working on
it
You can
fit either a square or round pole to the No. 7, but I obtained
a nice square ash tongue from the Amish. The tongue was nearly
ready to go, but with the rounded top to the recess where
the tongue is mounted, I decided to try to make the pole fit
a little better. Being a woodworker, I know that the tighter
and more precise the fit, the stronger the joint will be.
I want to get as much metal to wood surface area as I can.
I decided to round the top of my pole to make a better fit.
This is not necessary, but I think it makes it look nicer
and makes it stronger.

Another
thing was the pole was a little too deep (top to bottom) to
clear the adjustment rod that runs underneath, near the back.
I want as much wood as possible, so I notched out a section
of the pole, just enough to clear the rod.

I notched just the back of the pole to clear the rod
Once fitted
and the holes are drilled, I'll put a coat of varnish on the
bare wood to add some protection. I'll also add the black
decorative striping to the top of the tongue before mounting
it.
- - -
- - - -
Striping
the Tongue
The No.
7 had a black decorative stripes running along the top of
the tongue just past the doubletrees. You can see the stripes
in several illustrations in McCormick-Deering manuals and
publications, but I have yet to find a photo of the stripes.
This is my best interpretation of what they should be.
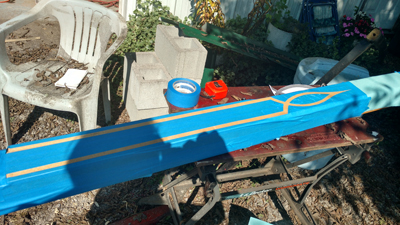
With no
fancy script or combination of colors, I used masking tape
to mark off the area where the striping should be, then simply
applied a few light coats of black spray paint. Light coats
reduce the chance of bleeding. Afterwards, I applied a couple
of coats of clear to seal the stripes.
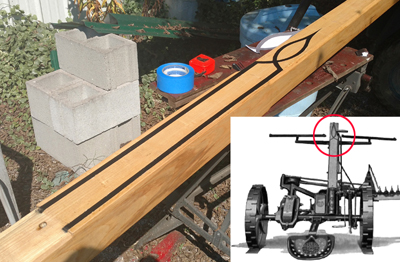
You can see the striping in the illustration at the bottom
right
The stripes
were on at least some late model No. 6 mowers, and all No.
7 mowers. The striping was eliminated in 1939 after the No.
9 models were introduced.
- - -
- - - - -
The
Tracker Stick
I made
the tracker stick using a piece of oak on a lathe. I tapered
the stick slightly and rounded the end.
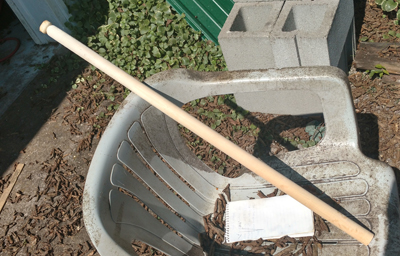
Unfortunately
I don't have any original parts to go by, and I had to make
the metal mounting bracket from scratch. The bracket wraps
around the stick and has two holes for mounting to the board.
The stick pivots on the back bolt, while the pointed end enters
one of three holes, allowing for the stick to be adjusted
in height.

I cut
out the bracket from a thick piece of sheet metal, then, using
a hammer, rounded the metal around the stick. The pointed
end sits flat against the board, so after rounding it, I put
it in a vice to flatten the end. After drilling the holes,
I'll prime and paint this piece red.
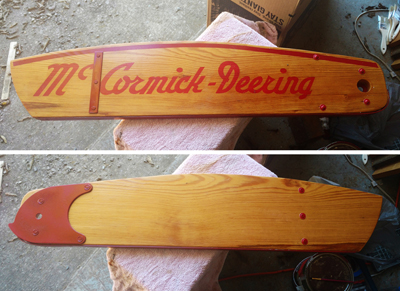
The
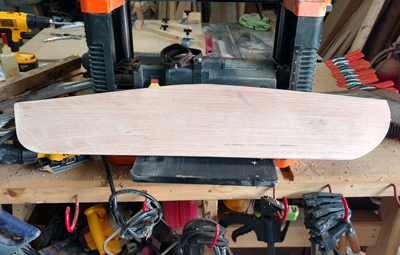
grassboard is almost finished. I didn't have an original grassboard
to go by and had to rely on old photos and illustrations to
make this one, basically from scratch. I fabricated pretty
much all the metal and cut out the sassafras wood. One thing
I did have was an original John Deere grassboard. I used it
to get the general dimensions and the angle for the grass
stick. There is also a thick metal band running along the
bottom of the board, to help reduce wear. The board attaches
with a bolt and a spring at the end of the mower bar. The
spring allows the board to flex should it hit some kind of
obstacle.
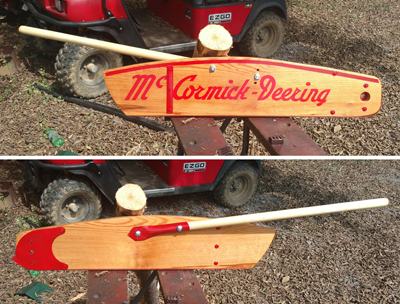
Here's
the finished grassboard with the grass stick attached with
carriage bolts and square nuts. I think it turned out pretty
good. I'll add the spring and attach it to the mower bar.
-
- - - - - - -
Making
the Yoke
With the
grassboard finished, I turned my attention to the evener.
The evener, or yoke, is the wooden bar mounted on the front
end of the tongue. McCormick-Deering's literature refers to
this bar as the evener, but later calls it the yoke. The middle
bar of the double tree is also called an evener by some, so,
as not to confuse the two, I'll refer to the front evener
as the yoke, and the middle bar on the double tree as the
evener.
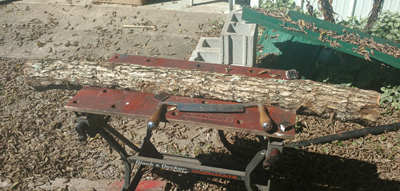
I have
the original yoke for the machine, but like so much else on
the mower, it had seen better days. The yoke had seen many
hours of use with the wood worn around the ends, and the metal
rings and eye bolts worn thin. I could have restored the original,
but I decided to just make a new one.

Luckily,
last winter, I had a white oak tree fall on my property. This
gave me a good source for a piece of wood that would need
to be three inches thick. After finding a nice, straight branch,
I cut it and stripped off the bark. I was going to have to
turn the yoke on a lathe, but the piece I needed was about
four inches longer than what my lathe could hold. Fortunately,
I had a solution.
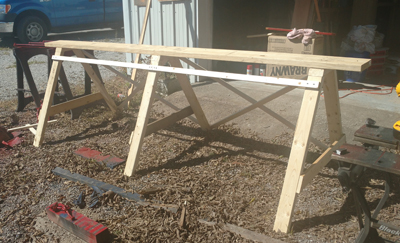
I found
my wood lathe at an auction for $5, and I figured the price
was so low, I actually bought two. The reason I wanted two
lathes is just for this type of problem. When turning bed
posts, and high-back chairs, I would need a long lathe so
I wouldn't have to turn them in two pieces. I tore the cheap
lathes apart and found that the reason neither worked was
that whoever owned them before had never bothered to lube
them. After oiling them up, and some gentle persuasion, both
worked perfectly. I built a A-frame bench long enough for
both lathes, then simply bolted them on, end to end. This
gave me a long lathe track, allowing me to turn long pieces.
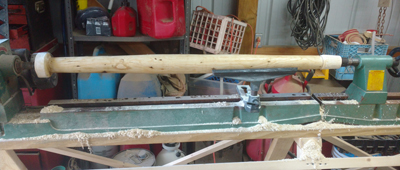
A little
time on the band saw, and with a draw knife, helped me balance
out the log. Then, I mounted it onto the lathe. I rounded
the wood at three inches, then worked from the middle to taper
it at both ends. The yoke needs to be the same length as the
double tree evener, with the metal rings on the yoke lining
up with the bolts on the evener.
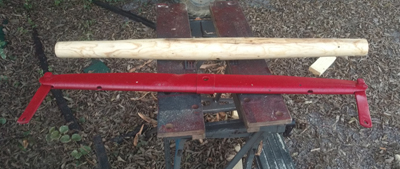
I discovered
that finding three or four inch steel rings is actually pretty
hard. The biggest rings that most tractor or farm supply stores
have is two inches, way too small for my needs. Once again,
the Internet came to the rescue. I found a source for non
welded three and a half inch steel rings online. I need them
to not be welded so I can install them onto the new eye bolts.
Once installed, I weld them together myself.
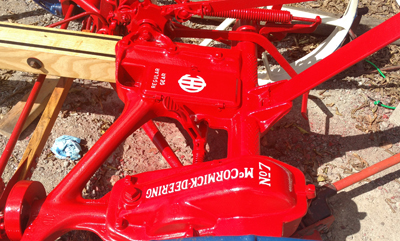
Painting
the Raised Lettering
There
is really no other way to do this, except for with a very
small brush, and a steady hand. Yes, the raised lettering
on the mower body was highlighted in International white.
It's not as hard as it might look, but it takes a long time
to do it right. After I did this, I sprayed the whole body
with a clear coat for extra protection.
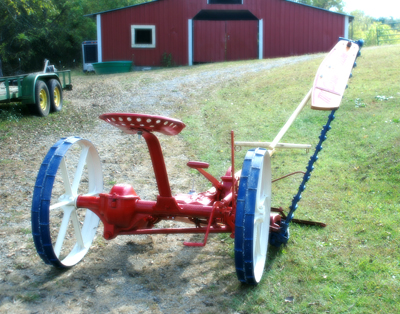
Finally
Complete!
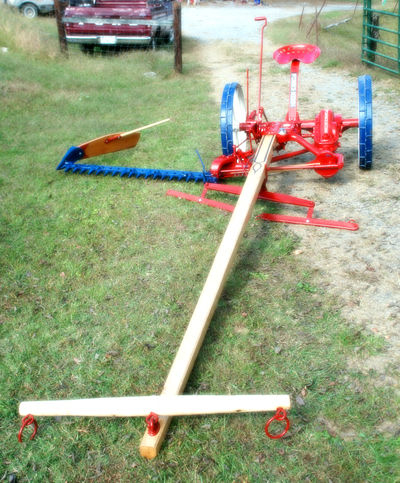
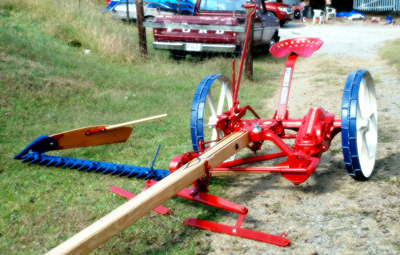
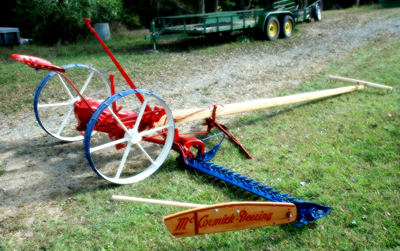
Well,
here it is! If you ever wondered what a McComick-Deering No.
7 Mower looked like when it was brand new, here it is. So
many today only see these as lawn ornaments or mailbox mounts.
This mower is complete with its correct wrench, oil can, decal,
lettering, and the correct Red, White, and Blue color scheme.
The tongue is ash, while the yoke and pitman are made from
white oak. The grassboard is sassafras.
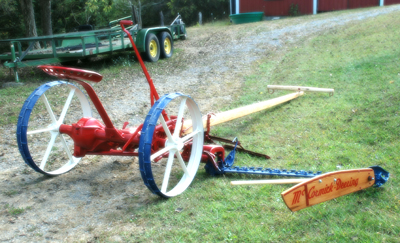
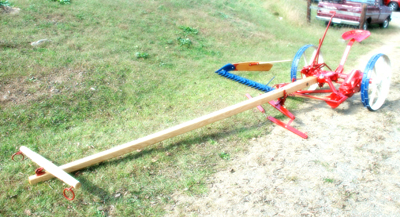
The only
thing that would not be considered accurate is that the tongue
and yoke are natural with a varnish. Originals would have
been painted ochre, which is a yellow-orange color. Most replacement
parts wouldn't have been painted, and I think the natural
looks better.

10/06/2017
- Thanks for stopping by twodawgs1@dtccom.net
|

